About me…
Just a quick note, I have updated the About Fryguy page. If you are interested (or bored), please feel free to chec ./ it out.
So, what are you waiting for? Click that About Fryguy’s link under the FryGuy’s Blog title!

Just a quick note, I have updated the About Fryguy page. If you are interested (or bored), please feel free to chec ./ it out.
So, what are you waiting for? Click that About Fryguy’s link under the FryGuy’s Blog title!
Just a quick post on something I noticed today on the Cisco Data Center Architecture announcement today. The slide below got my attention, and quick! If you look at what I have circled, you will see a reference to a Nexus 2248TP FEX that is supported on the Nexus 7000 switch.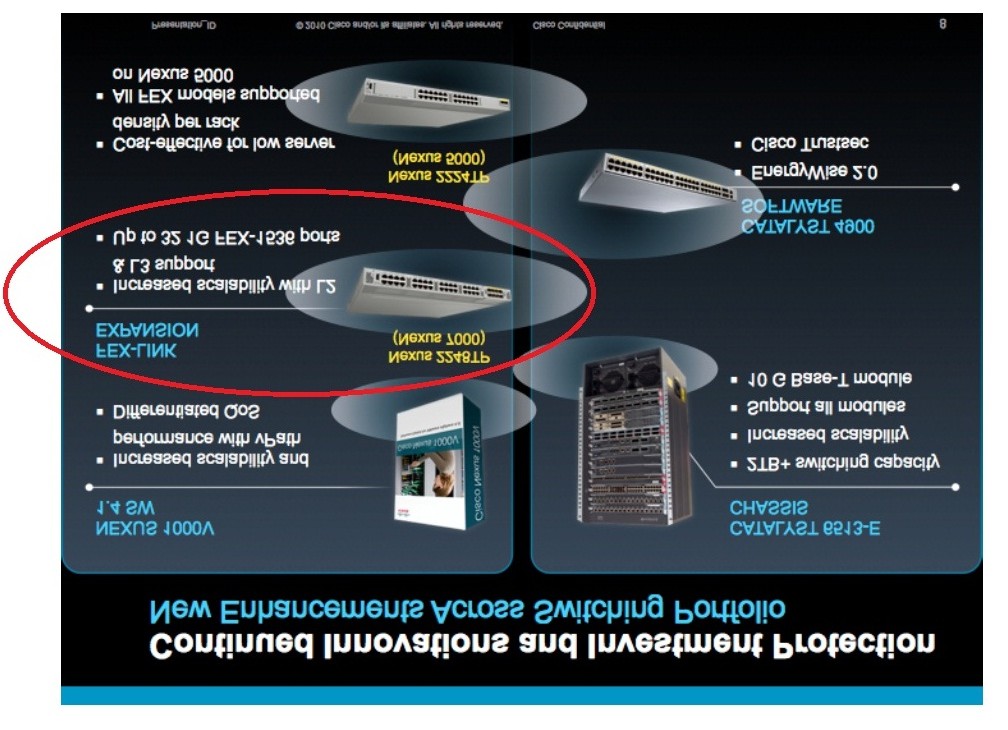
When I check out the Cisco website ( http://www.cisco.com/en/US/products/ps10783/ ) for the Nexus 2248TP, it also referenced the Nexus 7000 as a parent switch. I have heard rumors of this for quite some time – but have never seen anything official on it until today. Perhaps I have had my head in the sand because of the Nexus install that I was working on.
Oh yeah, notice the Cisco 6513 there – 2TB+ switching capacity? Hmm… New Supervisor 2 TB coming?
This is the second part in a two part post on Etherchannel on the Nexus 7000. In the first part I covered how to configure vPC on the Nexus 7000, here I will cover what it takes to get a remote switch to uplink to the Nexus 7000 core switches using vPC/Multi-chassis etherchannel. Here is a diagram depicting the layout that we are using. For this part of the post, we will focus on the blue line that is connecting both Nexus switches to the 3750 Stack.On the Cisco 3750 switches (they are in a stack configuration of two switches) we need to configure the interface to be in a channel-group - for this example Iam using Channel-Group 6 (the switch is actually named StackSwitch06). What you will also notice is that you configure the 3750 Stack just like it was only connected to one switch, just one single port-channel that consists of all the ports connected to both Nexus switches. For this example we are using ports G1/0/1, G1/0/24, G2/0/1, and G2/0/24. One thing I want to mention, when you are thinking about your uplinks to your core switches, be aware of the switch ASIC layout. I say this because I have seen many times when companies use ports 23 and 24 to uplink to a core switch. The problem with this is that: 1) The same ASIC is probably controlling both ports, and if it goes bad your links to the switch are gone and your switch is also isolated. 2) You have a better chance of oversubscribing the ASIC before the uplink when utilization is high on the channel. Now, onto the configuration, first up the Cisco 3750s. interface GigabitEthernet 1/0/1 description [----[ Uplink to N7K1 - E9/10 ]----] switchport trunk encapsulation dot1q switchport mode trunk channel-group 6 mode active interface GigabitEthernet1/0/24 description [----[ Uplink to N7K2 - E9/10 ]----] switchport trunk encapsulation dot1q switchport mode trunk channel-group 6 mode active interface GigabitEthernet 2/0/1 description [----[ Uplink to N7K1 - E10/10]----] switchport trunk encapsulation dot1q switchport mode trunk channel-group 6 mode active interface GigabitEthernet2/0/24 description [----[ Uplink to N7K2 - E10/10]----] switchport trunk encapsulation dot1q switchport mode trunk channel-group 6 mode active Once the interfaces are assigned to the channel-group, we can configure the etherchannel on the Cisco 3750s. Notice that there is no vPC info nor anything else that says this is connected to two switches. interface Port-channel6 switchport trunk encapsulation dot1q switchport mode trunk Now, on the Nexus side we need to do some configurations as well. Both Nexus switches are also configured the same, so there are no differences in the switch configs. interface Ethernet9/10 description [----[ StackSwitch6-1 ]----] switchport switchport mode trunk channel-group 6 mode active no shutdown
interface Ethernet10/10 description [----[ StackSwitch6-1 ]----] switchport switchport mode trunk channel-group 6 mode active no shutdown Now, when it comes to configuring the etherchannel on the Nexus switches, is is configured the same except for the addition of a vPC identifier. I recommend using the same number that you used for the port-channel for easy identification, but that is up to you. interface port-channel6 description [----[ LACP EtherChannel for StackSwitch6 ]----] switchport switchport mode trunk vpc 6Once you have it configured on the Nexus, make sure it is up and in the vPC correctly. N7K1# sh int port-channel 6 port-channel6 is up vPC Status: Up, vPC number: 6 Hardware: Port-Channel, address: 5475.d04f.1165 (bia 5475.d04f.1165) Description: [----[ LACP EtherChannel for RackSwitch6 ]----] Members in this channel: Eth9/10, Eth10/10 N7K1#Once you have confirmed that all is working correctly, you can check out the StackSwitch spanning tree information: StackSwitch06#sh spanning-tree interface port-channel 6 Vlan Role Sts Cost Prio.Nbr Type ---------------- ---- --- --------- -------- -------------------------------- VLAN0001 Root FWD 3 128.656 P2p VLAN0002 Root FWD 3 128.656 P2p VLAN0003 Root FWD 3 128.656 P2p VLAN0004 Root FWD 3 128.656 P2p VLAN0005 Root FWD 3 128.656 P2p StackSwitch06#You will see that even though you are connected to two switches, the port-channel is seen as a single spanning-tree path to the root.
Well, just to mix this up a bit – decided to post on my new favorite drink from Starbucks. To be honest, the credit goes to Jennifer (@jenniferlucille on Twitter) for turning me onto this drink.
This year at Cisco Live 2010, Jennifer told me to try a Dirty Chai the next time I was at Starbucks and I initially hesitated. Took me about a month or so to finally order one – was in an airport and saw a Starbucks – and I have no idea why I waited so long. They are sooooo good.
So, what is a Dirty Chai? Simply a Chai Latte with a shot of Espresso added (many people recommend ordering it with Soy – I have yet to try that). It is funny how many places have not heard of it, but I will tell you this – they learn quick after a few times.
Next time you are at a Starbucks, go for it – you will not regret it!
The other day I received a question on Ether-channel and the Nexus 7000 - based on the question I felt it would be also good to include the information here. This will be a 2-part post, first part is the Nexus configuration for vPC, the second post will be on the mutli-chassis ether-channel configuration around the 3750 as well as the Nexus 7000 switches. What are the benefits of Multi-chassis (vPC) ether-channel? Basically all your up-links from your switches are in FORWARDING mode, nothing is in blocking mode in your spanning tree domain. What this means is that you have a loop free topology in your data center and all links can be utilized. Below is the diagram of the configuration that I will be showing here. There will be a Layer 2 Ether-channel vPC between the Nexus 7010-1 and Nexus 7010-2 (Orangish line), a Layer 3 Ether-channel for vPC keep-alive (Red line), as well as a mutli-chassis (vPC) ether-channel from a 3750 stack to Nexus 7010-1 and Nexus 7010-2 with all links in a single ether-channel bundle.
Ok, the Nexus switches have been installed and running for over a week now with no further problems and there has been no fallout that I need to address prior to this post. Everyone at work took the change well, and understood some of the issues that we ran into as well as how we addressed them.
Just to recap what we did and the thoughts around why…
– Location had two Cisco 6509 switches running Sup2/MSFC2 as well as 6548 line cards – running for over 8 years
– Switches had started to show failures on line-cards on a more regular basis, chalked up to age of equip.
– When line-cards failed, spanning-tree loops where introduced which had the ability to severely impact the site
– Recently installed a large VM environment in location with the understanding of DMZ requirements in the near future
– This is a date center location, so data center level hardware was required (10g capabilities and beyond)
– In a single night, removed both Cisco 6509 switches, reconnected about 250 servers, and moved to LACP Etherchannel on all Rack switches in STP forwarding mode
– Also built a temporary network to maintain customer traffic through the site
Now, these requirements might not scream Nexus 7000 hardware – but we do not change core datecenter hardware very often and wanted to install a switch that had more “future proofing” built-in than other switches. The Cisco 6509E chassis in VSS mode has many of these features, but Cisco is investing money in the Nexus line and we felt that this is the proper way to go. Also, with a potential web presence imminent, the VDC and OTV capabilities of the Nexus are a perfect fit.
To be honest, the installation went really well. We where able to remove both Cisco 6509 switches in about an hour (they were DC, so an electrician was required) and get the new Nexus 7010 shoe-horned in their place. The Nexus are some heavy beasts, these where north of 500 lbs each – so I highly recommend removing the Power Supplies if possible. To be honest, the way that Cisco has designed these, they rack easily. Just like the Cisco 6500, the Nexus sits on a shelf for support and then gets screwed in on the face to the rack. We had the new network up and running, ready for cut-over by around 5 AM – 5 hours after we started.
So, what problems did we encounter – that is where the fun begins. What is funny is that only 1 of the problems I would consider a network design issue, the others where the typical – oh, we did not know that – or, whoops, type in the default gateway IP address.
So, the first problem that was actually a design issue was L3 neighbor routing over vPC – even though Cisco does not come out and say it does not work in the documentation, trust me – it does not. Per Cisco’s doc ( http://www.cisco.com/en/US/docs/switches/datacenter/sw/5_x/nx-os/interfaces/configuration/guide/if_vPC.pdf )
Configuring VLAN Interfaces for Layer 3 connectivity
You can use VLAN network interfaces on the vPC peer devices to link to Layer 3 of the network for such
applications as HSRP and PIM. However, we recommend that you configure a separate Layer 3 link for
routing from the vPC peer devices, rather than using a VLAN network interface for this purpose.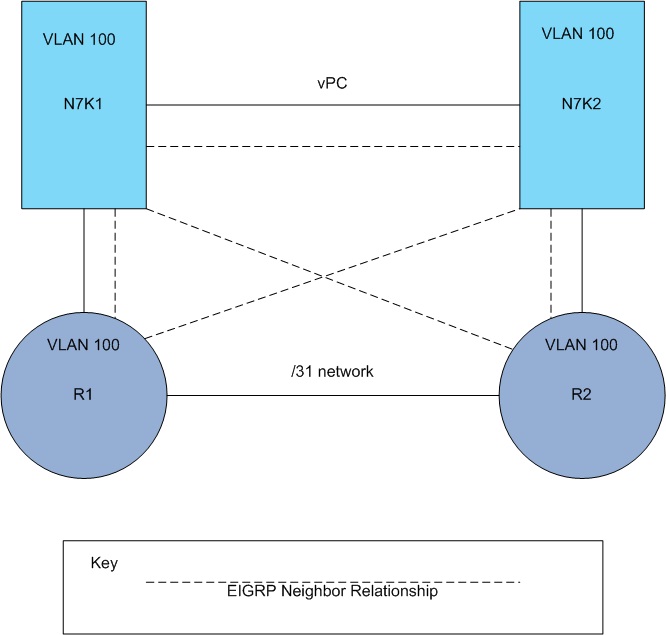
Now, as you can see from the above picture we have a EIGRP Neighbor relationship between all the routers and the core switches (R1-N7K1, R1-N7K2, R2-N7K2, R2-N7K1). Typically this is fine in a normal spanning-tree network, but what happens when using a VPC is something different. When a packet is received on R1 and R1 then decides that the next hop should be N7K2, but the device that R1 is trying to get to is attached to N7K1 (direct or etherchannel – the packet is dropped as it would need to transverse the vPC link twice. N7K2 sees the packet and just drops it. It actually sets a bit on the packet when it is received over the vPC link so that it is not re-transmitted back over the link. This is a loop-prevention mechanism, and that is a good thing as you can guess.
In order for us to fix this design flaw, we just had to make the links between R1 and N7K1 a L3 interface as well as between R2 and N7K2 a L3 interface. We actually talked about doing this prior to the Nexus being installed, but chose to wait as we did not want to change too many things at one time. The final design looks like this.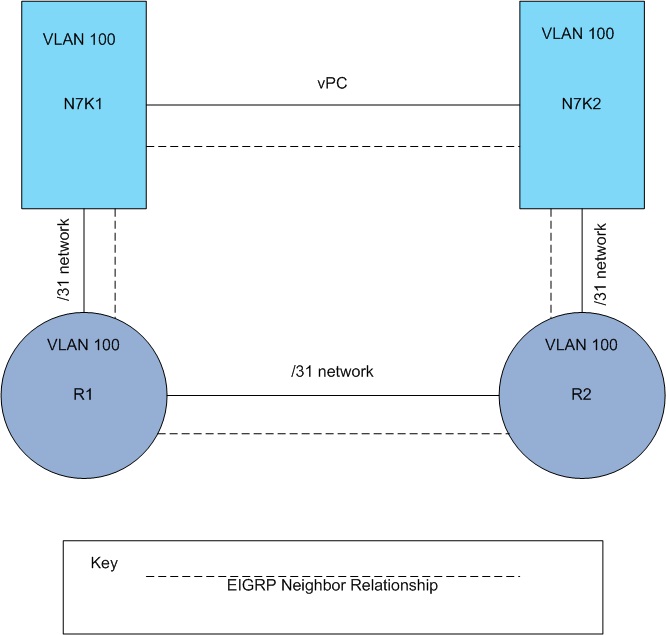
Now, some of the other problems that we encountered that where hardware related was a bad Supervisor module (backup supervisor actually) that was causing high CPU usage on the box. The first Nexus was running at 10-20% cpu whereas the second Nexus was running at 90-100% CPU. This was a little more difficult to track down as there where no errors in the log, but the way we figured it out was that one line card was stuck in a “downgrade in progress” message on some of the ports. The way that message showed up is that we actually downgraded from 5.0.3 to 5.0.2 to see if we had a bug in code that was causing the CPU issues. I will admit, Cisco had us a new supervisor as well as a line card in about 2 – 3 hours after we figured that out.
The last two problems that we encountered where out of out control – one problem that we experienced was bad default gateways on devices. I do not know how they where working prior to the upgrade as they had a non-existent IP address configured for the default gateway. Perhaps they had a static route and it disappeared when the network link went down. That is the only logical explanation that I can figure – and we had a few devices that did this, so it may actually be a “feature” in their code. Luckily, those devices have now been fixed.
The last one that we had taken us a bit longer to figure out – and it turns out that a “socks and sandle” person from the vendor had to get on the phone. We had a device that plays audio message to end-users, and since the installation of the Nexus that feature was no longer working. Stuck us as odd and out of character for it to be related to the new core switches, but since it broke after the install – we kept at it until we figured it out. What it turns out was the Nexus was receiving the packet ( it is the default gateway ) and dropping it. Why you ask, well because the vendor wrote their application to use the default gateway to loop the packet. ie – the same source and destination are in the packet, just routing it through the default gateway. The Nexus, and most any other security conscious device, would drop that packet as it is viewed as a spoof packet. Reviewing the logs in the main VDC, I can see the following error message: 2010 Aug 26 12:49:07 N7K1 %EEM_ACTION-6-INFORM: Packets dropped due to IDS check address reserved on module 9. Once we disabled that feature, everything started to work.
So what is the moral of all of this, well – it is good to know how all the software on your network is configured – but that honestly almost impossible to do. What does help is speaking with the vendors before the change so they are aware of what you are doing – and we did, we actually had pro-active tickets with all vendors for the change. I will also say that getting all the vendors on the phone (TAC, Vendor, etc) makes a huge difference. We had TAC on the phone (actually they usually had 2 TAC Nexus Engineers on the calls) and the vendor and they worked out all the communications between devices and figured it out. But in the end what did it was the “socks and sandle” person from the vendor who said “you know, it does this…” to get the light-bulb to click.
I just want to say, all-in-all this installation went very well – few bumps in the road, but they where to be expected. It helps to have a good team of people who you can count on when you are doing this, and thankfully I have that.
Well, the Nexus 7010 pair have been installed and are working like champs now. It was a nightmare of an install, nothing like shoehorning a new technology switch to replace an old technology switch. Even with planning, planning, and more planning we got bit by bugs, old design flaws, and just some ancillary problems that might have not been related to what we did – but are being blamed on it because they coincided. The norm as we all know it.
I have received a copy of the TAC case notes and will digest the information over the next few days and post some of the mistakes that we made so that you do not make them in the future.
The first deployment is always the hardest and where you learn the most. Stuff like this makes you either love what you do or hate it, but usually both at times 🙂 Still, I love what I do – the problems that I run into are a wonderful opportunity to learn.
As promised, here is a list of the Smart Call Home groups and the commands that they execute.
All commands start with SHOW, I have left that out due to spacing constraints.
Group Description Commands ------------ --------------------- ------------------------------- Cisco TAC All critical alerts Executed commands based on the from the other groups alert group that originates the alert Configuration Periodic events module related to configs running-configuration vdc-all all start-configuration vdc-all vdc current vdc membership version Diagnostic Events generated by diagnostic result module all detail diagnostics diagnostic result module number detail hardware logging last 200 module sprom all tech-support gold tech-support platform tech-support sysmgr vdc current vdc membership version EEM Events generated by diagnostic result module all detail by Embedded Event diagnostic result module number detail Manager module tech-support gold tech-support platform tech-support sysmgr vdc current vdc membership Environmental Events related to environment power, fan, etc logging last 200 module vdc current vdc membership version Inventory Inventory status inventory that is provided license usage when a unit is is module cold booted or FRU system uptime inserted or removed sprom all vdc current vdc membership versionLicense Events related to license usage vdc all to licensing logging last 200 vdc current vdc membership Linemodule Events related to diagnostic result module detail hardware standard or smart diagnostic result module number detail switching mods. hardware logging last 200 module sprom all tech-support ethpm tech-support gold tech-support platform tech-support sysmgr vdc current vdc membership version Supervisor Events related to diagnostic result module all detail hardware the supervisor hardware logging last 200 module sprom all tech-support ethpm tech-support gold tech-support platform tech-support sysmgr vdc current vdc membership version Syslog port Events generated license usage group syslog PORT facility logging last 200 vdc current vdc membership System Events generated diagnostic result module all detail by a failure of a hardware system that is logging last 200 critical to the module units operation sprom all tech-support ethpm tech-support gold tech-support platform tech-support sysmgr vdc current vdc membership Test This group is for module user generated test vdc current messages vdc membership version
CallHome feature is not anything new, it has been around for quite some time now. I remember hearing about it when the Sup720 years ago. Believe it or not, I never really bothered to configure it or really tinker with it as our corporate support contract is through a VAR and not direct with TAC.
Well, with our Nexus switches I figured it was time to take a good look at this feature and configure it for internal use as well as for connectivity to our VAR. Since I am configuring this feature, figured it was a good time to blog on how to!
This excert is taking directly from Cisco’s website on what Smart CallHome is:
Cisco® Smart Call Home is an award-winning, embedded support feature available on a broad range of Cisco products. Smart Call Home enabled devices continuously perform proactive diagnostics on their own components to provide real-time alerts and remediation advice when an issue is detected.
So, without future ado, here is how to configure Smart CallHome on the Nexus 7000:
Before we release our Nexus 7000’s to the productions packets, we are upgrading to a newer version of code. Since we are doing this, I figured it would be a good opportunity to document the ISSU upgrade process.
The Nexus 7000 has two images in order to run. The first is a Kickstart image and the second is the actual System image. The Kickstart image contains the Linux kernel, basic drivers, and initial file system. The System Image contains the system software and infrastructure code.
I prefer to use FTP to transfer large files; you can also copy them via TFTP or USB if you wish. For this post, I will demonstrate FTP.
1. Start your local FTP server (or place files on common FTP server). In my case the IP of the FTP server is 10.1.3.11
2. On the Nexus 7000, execute the following command to copy the kickstart image using the management VRF in this example:
N7K1# copy ftp://nexus@10.1.3.11/n7000-s1-kickstart.5.0.3.bin bootflash://sup-local/_
_ Enter vrf (If no input, current vrf ‘default’ is considered): management
Password: nexus
[## ] 4.15MB
This is the progress indicator bar that shows you transfer status
***** Transfer of file Completed Successfully
3. Now you can copy the NXOS code to the bootflash:
N7K1# copy ftp://nexus@10.1.3.11/n7000-s1-dk9.5.0.3.bin bootflash://sup-local/
Enter vrf (If no input, current vrf ‘default’ is considered): management
Password: nexus
[## ] 4.15MB
_ Transfer of file Completed Successfully ***** _
4. Now that you have the files on the Active supervisor, copy them to the standby supervisor:
N7K1# copy bootflash:/n7000-s1-dk9.5.0.3.bin bootflash://sup-2/
Copy progress 100% 107430KB !This is the progress indicator bar that shows you transfer status
N7K1# copy bootflash:/n7000-s1-kickstart.5.0.3.bin bootflash://sup-2/
Copy progress 100% 24522KB
5. To validate that you have successfully copied to the standby supervisor, you should also attach to it and check the directory.
N7K1# attach module 6
Attaching to module 6 …
To exit type ‘exit’, to abort type ‘$.’
Cisco Nexus Operating System (NX-OS) Software
TAC support: http://www.cisco.com/tac
Copyright (c) 2002-2010, Cisco Systems, Inc. All rights reserved.
The copyrights to certain works contained in this software are
owned by other third parties and used and distributed under
license. Certain components of this software are licensed under
the GNU General Public License (GPL) version 2.0 or the GNU
Lesser General Public License (LGPL) Version 2.1. A copy of each
such license is available at (SNIP)
N7K1(standby)# dir
3610 Jul 14 20:37:16 2010 aaa_cnv.log
16384 Jan 13 12:40:30 2008 lost+found/
100118021 Jan 14 11:11:23 2008 n7000-s1-dk9.4.2.4.bin
107369112 Jul 14 19:58:04 2010 n7000-s1-dk9.5.0.2a.bin
107430217 Aug 10 14:14:19 2010 n7000-s1-dk9.5.0.3.bin
24727552 Jan 14 11:11:37 2008 n7000-s1-kickstart.4.2.4.bin
23613440 Jul 14 19:56:49 2010 n7000-s1-kickstart.5.0.2a.bin
24522752 Aug 10 14:21:11 2010 n7000-s1-kickstart.5.0.3.bin
4096 Jan 13 14:29:21 2008 vdc_2/
4096 Jan 13 14:29:21 2008 vdc_3/
4096 Jan 13 14:29:21 2008 vdc_4/
Usage for bootflash://
513769472 bytes used
1296130048 bytes free
1809899520 bytes total
N7K1(standby)#
6. Now you can return to the active supervisor by typing exit
N7K1(standby)# exit
rlogin: connection closed.
N7K1#
7. Before continuing, make sure that all your configs are saved and backed up to an external device. I suggest copying them to a TFTP server for disaster recovery. A rollback will automatically be created when you perform the upgrade, but an added insurance policy is suggested.
N7K1# checkpoint file bootflash:081010_MainVDC.cfg
Done
N7K1# switchto vdc coreSwitch1
Cisco Nexus Operating System (NX-OS) Software
TAC support: http://www.cisco.com/tac
Copyright (c) 2002-2010, Cisco Systems, Inc. All rights reserved.
The copyrights to certain works contained in this software are
owned by other third parties and used and distributed under
license. Certain components of this software are licensed under
the GNU General Public License (GPL) version 2.0 or the GNU
Lesser General Public License (LGPL) Version 2.1. A copy of each
such license is available at
(SNIP)
N7K1-CoreSwitch1# checkpoint file bootflash:081010_VDC1.cfg
Done
N7K1-CoreSwitch1# switchback_
N7K1#_
8. Prior to the upgrade of the code, I highly recommend checking the impact of the upgrade. This is a good command to run
when you are preparing your Chance Controls as you can validate the file as well as the impact.
You can do this by using the following command:
N7K1# show install all impact kickstart bootflash:n7000-s1-kickstart.5.0.3.bin system bootflash:n7000-s1-dk9.5.0.3.bin
Verifying image bootflash:/n7000-s1-kickstart.5.0.3.bin for boot variable “kickstart”.
[####################] 100% — SUCCESS
Verifying image bootflash:/n7000-s1-dk9.5.0.3.bin for boot variable “system”.
[####################] 100% — SUCCESS
Verifying image type.
[####################] 100% — SUCCESS
Extracting “lc1n7k” version from image bootflash:/n7000-s1-dk9.5.0.3.bin.
[####################] 100% — SUCCESS
Extracting “bios” version from image bootflash:/n7000-s1-dk9.5.0.3.bin.
[####################] 100% — SUCCESS
Extracting “lc1n7k” version from image bootflash:/n7000-s1-dk9.5.0.3.bin.
[####################] 100% — SUCCESS
Extracting “lc1n7k” version from image bootflash:/n7000-s1-dk9.5.0.3.bin.
[####################] 100% — SUCCESS
Extracting “system” version from image bootflash:/n7000-s1-dk9.5.0.3.bin.
[####################] 100% — SUCCESS
Extracting “kickstart” version from image bootflash:/n7000-s1-kickstart.5.0.3.bin.
[####################] 100% — SUCCESS
Extracting “lc1n7k” version from image bootflash:/n7000-s1-dk9.5.0.3.bin.
[####################] 100% — SUCCESS
Extracting “lc1n7k” version from image bootflash:/n7000-s1-dk9.5.0.3.bin.
[####################] 100% — SUCCESS
Extracting “lc1n7k” version from image bootflash:/n7000-s1-dk9.5.0.3.bin.
[####################] 100% — SUCCESS
Extracting “lc1n7k” version from image bootflash:/n7000-s1-dk9.5.0.3.bin.
[####################] 100% — SUCCESS
Extracting “cmp” version from image bootflash:/n7000-s1-dk9.5.0.3.bin.
[####################] 100% — SUCCESS
Extracting “cmp-bios” version from image bootflash:/n7000-s1-dk9.5.0.3.bin.
[####################] 100% — SUCCESS
Performing module support checks.
[####################] 100% — SUCCESS
Notifying services about system upgrade.
[####################] 100% — SUCCESS
Compatibility check is done:
Module bootable Impact Install-type Reason
—— ——– ————– ———— ——
2 yes non-disruptive rolling
3 yes non-disruptive rolling
4 yes non-disruptive rolling
5 yes non-disruptive reset
6 yes non-disruptive reset
7 yes non-disruptive rolling
8 yes non-disruptive rolling
9 yes non-disruptive rolling
10 yes non-disruptive rolling
[==== Output Omitted ====]
N7K1#
Note: The key piece of information here is the Impact column. As you can see here,
this upgrade is non-disruptive (call it minimal) to traffic. The only two modules
that need to be reset are the Supervisors (Mod 5 and 6)
9. Once you have validated the images, you can now proceed with the upgrade. To upgrade the images, use the install command.
N7K1# install all kickstart bootflash:n7000-s1-kickstart.5.0.3.bin system bootflash:n7000-s1-dk9.5.0.3.bin
Verifying image bootflash:/n7000-s1-kickstart.5.0.3.bin for boot variable “kickstart”.
[####################] 100% — SUCCESS
Verifying image bootflash:/n7000-s1-dk9.5.0.3.bin for boot variable “system”.
[####################] 100% — SUCCESS
Verifying image type.
[####################] 100% — SUCCESS
Extracting “lc1n7k” version from image bootflash:/n7000-s1-dk9.5.0.3.bin.
[####################] 100% — SUCCESS
Extracting “bios” version from image bootflash:/n7000-s1-dk9.5.0.3.bin.
[####################] 100% — SUCCESS
Extracting “lc1n7k” version from image bootflash:/n7000-s1-dk9.5.0.3.bin.
[####################] 100% — SUCCESS
Extracting “lc1n7k” version from image bootflash:/n7000-s1-dk9.5.0.3.bin.
[####################] 100% — SUCCESS
Extracting “system” version from image bootflash:/n7000-s1-dk9.5.0.3.bin.
[####################] 100% — SUCCESS
Extracting “kickstart” version from image bootflash:/n7000-s1-kickstart.5.0.3.bin.
[####################] 100% — SUCCESS
Extracting “lc1n7k” version from image bootflash:/n7000-s1-dk9.5.0.3.bin.
[####################] 100% — SUCCESS
Extracting “lc1n7k” version from image bootflash:/n7000-s1-dk9.5.0.3.bin.
[####################] 100% — SUCCESS
Extracting “lc1n7k” version from image bootflash:/n7000-s1-dk9.5.0.3.bin.
[####################] 100% — SUCCESS
Extracting “lc1n7k” version from image bootflash:/n7000-s1-dk9.5.0.3.bin.
[####################] 100% — SUCCESS
Extracting “cmp” version from image bootflash:/n7000-s1-dk9.5.0.3.bin.
[####################] 100% — SUCCESS
Extracting “cmp-bios” version from image bootflash:/n7000-s1-dk9.5.0.3.bin.
[####################] 100% — SUCCESS
Performing module support checks.
[####################] 100% — SUCCESS
Notifying services about system upgrade.
[####################] 100% — SUCCESS
Compatibility check is done:
Module bootable Impact Install-type Reason
—— ——– ————– ———— ——
2 yes non-disruptive rolling
3 yes non-disruptive rolling
4 yes non-disruptive rolling
5 yes non-disruptive reset
6 yes non-disruptive reset
7 yes non-disruptive rolling
8 yes non-disruptive rolling
9 yes non-disruptive rolling
10 yes non-disruptive rolling
Images will be upgraded according to following table:
Module Image Running-ersion(pri:alt) New-Version Upg-Required
[===== Output Omitted ====]
_
Note: As you can see, it does the impact analysis for you anyways when you do the install.
You will now need to confirm if you do want to do the upgrade by entering Y
Do you want to continue with the installation (y/n)? [n] y
Install is in progress, please wait.
Performing runtime checks.
[####################] 100% — SUCCESS
Syncing image bootflash:/n7000-s1-kickstart.5.0.3.bin to standby.
[####################] 100% — SUCCESS
Syncing image bootflash:/n7000-s1-dk9.5.0.3.bin to standby.
[####################] 100% — SUCCESS
Setting boot variables.
[####################] 100% — SUCCESS
Performing configuration copy.
[####################] 100% — SUCCESS
Module 2: Refreshing compact flash and upgrading bios/loader/bootrom.
Warning: please do not remove or power off the module at this time.
[####################] 100% — SUCCESS
Module 3: Refreshing compact flash and upgrading bios/loader/bootrom.
Warning: please do not remove or power off the module at this time.
[####################] 100% — SUCCESS
Module 4: Refreshing compact flash and upgrading bios/loader/bootrom.
Warning: please do not remove or power off the module at this time.
[####################] 100% — SUCCESS
Module 5: Refreshing compact flash and upgrading bios/loader/bootrom.
Warning: please do not remove or power off the module at this time.
[####################] 100% — SUCCESS
Module 6: Refreshing compact flash and upgrading bios/loader/bootrom.
Warning: please do not remove or power off the module at this time.
[####################] 100% — SUCCESS
Module 7: Refreshing compact flash and upgrading bios/loader/bootrom.
Warning: please do not remove or power off the module at this time.
[####################] 100% — SUCCESS
Module 8: Refreshing compact flash and upgrading bios/loader/bootrom.
Warning: please do not remove or power off the module at this time.
[####################] 100% — SUCCESS
Module 9: Refreshing compact flash and upgrading bios/loader/bootrom.
Warning: please do not remove or power off the module at this time.
[####################] 100% — SUCCESS
Module 10: Refreshing compact flash and upgrading bios/loader/bootrom.
Warning: please do not remove or power off the module at this time.
[####################] 100% — SUCCESS
2010 Aug 10 15:22:34 N7K1 %PLATFORM-2-MOD_REMOVE: Module 6 removed (Serial number JAF14XXXXXX)
2010 Aug 10 15:26:43 N7K1 %CMPPROXY-STANDBY-2-LOG_CMP_UP: Connectivity Management processor(on module 6) is now UP
Module 6: Waiting for module online.
— SUCCESS
Notifying services about the switchover.
[####################] 100% — SUCCESS
“Switching over onto standby”.
2010 Aug 10 15:33:55 N7K1 %$ VDC-1 %$ %CMPPROXY-STANDBY-2-LOG_CMP_UP: Connectivity Management processor(on module 5) is now UP
Module 2: Non-disruptive upgrading.
[####################] 100% — SUCCESS
Module 3: Non-disruptive upgrading.
[####################] 100% — SUCCESS
Module 4: Non-disruptive upgrading.
[####################] 100% — SUCCESS
Module 7: Non-disruptive upgrading.
[####################] 100% — SUCCESS
Module 8: Non-disruptive upgrading.
[####################] 100% — SUCCESS
Module 9: Non-disruptive upgrading.
[####################] 100% — SUCCESS
Module 10: Non-disruptive upgrading.
[####################] 100% — SUCCESS
Install has been successful.
User Access Verification
N7K1 login:
_
10. And just like that, both supervisors have been upgraded and are running the new code:
N7K1# sh ver
Cisco Nexus Operating System (NX-OS) Software
TAC support: http://www.cisco.com/tac
Copyright (c) 2002-2010, Cisco Systems, Inc. All rights reserved.
The copyrights to certain works contained in this software are
owned by other third parties and used and distributed under
license. Certain components of this software are licensed under
the GNU General Public License (GPL) version 2.0 or the GNU
Lesser General Public License (LGPL) Version 2.1. A copy of each
such license is available at
(SNIP)
Software
BIOS: version 3.22.0
loader: version N/A
kickstart: version 5.0(3)
system: version 5.0(3)
BIOS compile time: 02/20/10
kickstart image file is: bootflash:/n7000-s1-kickstart.5.0.3.bin
kickstart compile time: 7/12/2010 18:00:00 [07/24/2010 11:47:30]
system image file is: bootflash:/n7000-s1-dk9.5.0.3.bin
system compile time: 7/12/2010 18:00:00 [07/24/2010 13:21:35]