Heads-up

I will eventually be migrating the current site – blog.fryguy.net – over to here as time allows. For now, please visit the site – blog.fryguy.net

I will eventually be migrating the current site – blog.fryguy.net – over to here as time allows. For now, please visit the site – blog.fryguy.net

Scott – @scottm32768 on twitter – posted a link about this nifty piece of software called DisplayLink. It caught my attention very quick as he said it makes your iPad into a display for your Windows 7 PC. This is something I have been looking for for quite some time. I have seen some of the people at my work do this with their Apple computers using either the DisplayLink software or another vendor’s I believe.
So why am I doing a post on it, well to help get the word out, that is why! The DisplayLink application definitely helps to free up the real-estate on your computer as you can toss your Twitter application to it, your e-mail, perhaps a terminal application, or anything else you want to keep an eye on. This additional real estate on our computers is wonderful!
From their website, they say that the key features are:

This is just a quick post on a new venture one of my good friends, Brandon, has embarked on. Brandon is a well recognized and respected Cisco trainer in the industry and has published a few books for Cisco Press over the years. His books include CCNA Wireless Official Exam Certification Guide and _Cisco Access Control Security _as well as a few others.
Recently he has decided to embark on another endeavor, and this one could not have better timing. He is launching a website for IPv6 tutoring called MyIPv6Tutor.com
If you want to learn more about IPv6 and such, might be a good time to head over there and see what a Cisco Certified Systems Instructor has to say about IPv6!
We have all been hearing about IPv6 for a few years now. There have been numerous white papers published, blog posts, audio podcasts, as well as the normal twitter chatter on the topic. Lately this topic has come to the forefront more and more since the RIR have handed out the last of the IPv4 /8 networks to the regional registrars. So what does all this mean to you and I? Well, if you have not fully embraced IPv6, the time has definitely come.
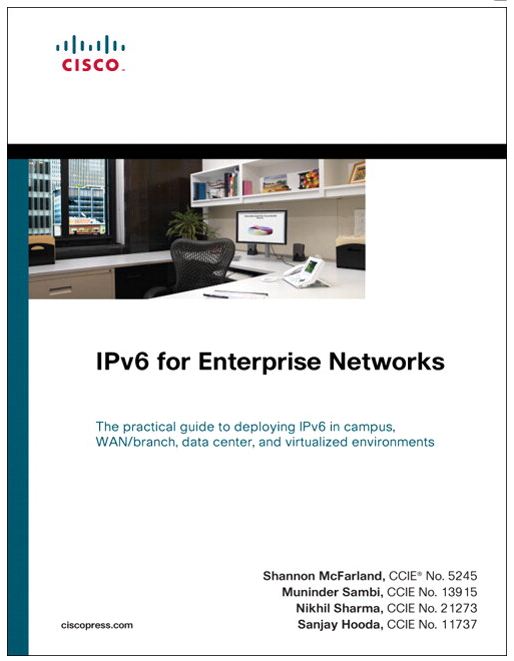
Luckily Cisco Press has recently released IPv6 for Enterprise Networks (Networking Technology) for our reading pleasure. Originally I was going to wait until Cisco Live 2011 to get this book, but I just could not wait and my friend, Jamie, was able to help me get it sooner. I am glad that I did not wait! This book is a great read and will help the reader to understand IPv6 as well as help to design and deploy a network.
The book consists of 12, well formatted chapters. They take you from the market drivers, to designing and services, deployment, and all the way to the data center and testing. What is nice about this book is the progression on the topics. You do not really need to know IPv6 to read this book, it will actually guide you through the whys and hows then onto the how to as well as testing. It is nice to have a book that will cover most of the topics that one will experience in an Enterprise design.
The first two chapters in the book talk about the market drivers for IPv6, these are some of the whys that people are wondering. This is a pretty quick chapter as the killer application is not really out there yet, but is sure to be coming (my best guess will be Asian/Pac e-commerce). What this chapter does elude to is that this is a good time to be able to restructure your network in a more efficient design. Consider this, you probably inherited your current network and the design that is currently in place. With a transition to IPv6, you now have the opportunity to reconsider what was done and determine were you should take it. The first chapter does good at giving you some points to consider as you read on and helps you to understand some of the underlying design scenarios.
The next two chapters, 3 and 4, start to go over how IPv4 and IPv6 will co-exist in the network and some of the ways to approach this challenge. There are dual-stacking, 6-to-4 tunnels, MPLS, and the good old duct tape of the network – GRE. It also continues to talk about services and some of the routing options that one has to consider. Service such as multicast and QoS are discussed for a decent amount of pages. These tend to be some of the more important items in an enterprise network. These chapters also discuss the different routing protocol options – OSPFv3, EIGRPv6, and IS-IS with a mention of BGP. What does surprise me, there is no discussion on LISP 🙂 Ok, that might have been asking for a bit much, but I do like LISP.
I think that Chapter 5 is a really important chapter in some ways. This is the chapter where Planning an IPv6 Deployment is discussed. This is a topic that should not be taken lightly but one that should be a primary focus. After all the technology and numbers, all that you really have to stand upon is good design. As i mentioned before, what is nice with IPv6 is that you do not have to base your new design on the existing design, you can actually rethink everything and start fresh. For instance, if you are currently running EIGRP but want to move to OSPF, deploying IPv6 is the time to start that move. The two protocols (v4 and v6) are separate from each other.
The next chapters, 6 through 10, are the heart of this book. Discussed in some good detail is deploying IPv6 in Campus, Virtualized, WAN/Branch, Data Centers as well as Remote Access. Each of these topics has a good chapter dedicated to it and there are many things that one needs to consider with each of these deployment scenarios. Again, it all comes down to the choices made during the design and testing phase.
Chapter 11 is a nice chapter on the aspects of Managing IPv6 Networks. It covers the different ways to monitor and secure various parts of the network. It is nice to actually see a chapter dedicated to some of the stuff that is quickly overlooked during a design an deployment – how to manage and support all the work that you have done. Most of this stuff is usually figured out near the end of a project when we hand off things to the NOC – and they say IPvWhat?
The final chapter in the book was a welcomed surprise to me. This chapter actually talks about how to setup a lab to test IPv6. It gives some good sample setups that should help the person be able to play with the protocol as well as test different scenarios. Granted, some of the hardware suggested might be a bit out of reach for most of us (VSS, ISR, etc) – but it is a good starting point to see what you can do. One can easily see ways to substitute certain hardware for other hardware so one can learn and develop. If you are going to roll some of this into production, test hardware is invaluable for knowing the problems before they are experienced in a live network.
Overall it is a good read and one that should be handy to those who are working with IPv6 right now. Not only can you use the information within the book for your own knowledge, but it gives you information on how you can explain it to others. One of the most difficult things that I come across in an enterprise is explaining difficult topics. This book helps me to find ways to explain things in ways that others might be able to understand.
 ][1]
][1]| Saturday | |||
| Fly and check in at Mandalay Bay as well as register for the event | |||
| Sunday | |||
| 8:00 – 17:00 | TECDCT-8001 | Next Generation Data Center Infrastructure | |
| Monday | 9:30 – 11:30 | BRKARC-3470 | Cisco Nexus 7000 Switch Architecture |
| 12:30 – 14:30 | BRKARC-3471 | Cisco NXOS Software – Architecture | |
| 15:00 – 17:00 | BRKRST-2335 | IS-IS Network Design and Deployment | |
| Tuesday | 8:00 – 9:30 | BRKRST-3045 | LISP – A Next Generation Networking Architecture |
| 10:00 – 11:00 | GENKEY-4700 | Keynote and Welcome Address | |
| 12:30 – 14:30 15:00 – 15:30 | BRKCOM-1005 GENNOC-9190 | UCS Systems Architecture Overview Cisco Live NOC Tour (CCIE/NetVet) | |
| 16:00 – 18:00 | BRKCRS-3144 | Troubleshooting Cisco Nexus 7000 Series Switches | |
| Wednesday | |||
| 8:00 – 10:00 | BRKCOM-2006 | UCS Reference Architecture for Enterprise Applications | |
| 10:30 – 11:30 | GENKEY-4701 | Cisco Technology Keynote | |
| 12:30 – 14:30 | BRKDCT-2121 | Virtual Device Context (VDC) Designing and Implementation Considerations with Nexus | |
| 16:00 – 18:00 | BRKVIR-3013 | Deploying and Troubleshooting the Nexus 1000V virtual switch | |
| Thursday | |||
| 8:00 – 10:00 | BRKCOM-1002 | Data Center Architectures and Virtual Private Data Centers with UCS | |
| 10:30 – 11:30 | GENDCT-4642 | Town Hall: Data Center | |
| 12:00 – 14:00 | BRKARC-3472 | NX-OS Routing & Layer 3 Switching | |
| 14:30 – 15:30 | GENKEY-4702 | Closing Keynote: William Shatner | |
| 16:00 – 17:30 | BRKMPL-2108 | Global WAN Redesign Case Study | |
| Friday | |||
| Fly home! | |||

Well, it is almost that time a year when all the “Networkers” get together at the annual Cisco Live event. It is still a few months away when I am writing this – but as we all know – time slows down for no one. I wanted to take a few moments and share with you why I attend as well as why you should consider attending. Please keep in mind that my experience is a bit different from the normal attendee as I am considered a NetVet as well as a CCIE, and being that we get a few additional perks during the event.
Ok, now that I have that basic LISP post out, you know this one LISP – Say What?!, I figured I would build upon that configuration. Today I will show you how to overlay IPv6 at your sites while keeping your core IPv4 only. There is no IPv6 addressing nor routing configured on the core Routers and this post will continue where the other one left off, no configuration changes have been made prior to this post, except I did have to upgrade from a base image to an Enterprise image to support IPv6 on R2, R3, and R4. R1 is still running an IOS that does not support LISP nor IPv6. This post will focus on the configuration first and then the explanation of how last.
Below is the same topology I used in the other LISP post, just added some IPv6 addressing and routing protocols for Site-A and Site-B. I am going to build on what we have done in the other lab, so not all the necessary LISP configs are here for a scratch-built config. I have included the full configs in the bottom of this post if you would like to look at them.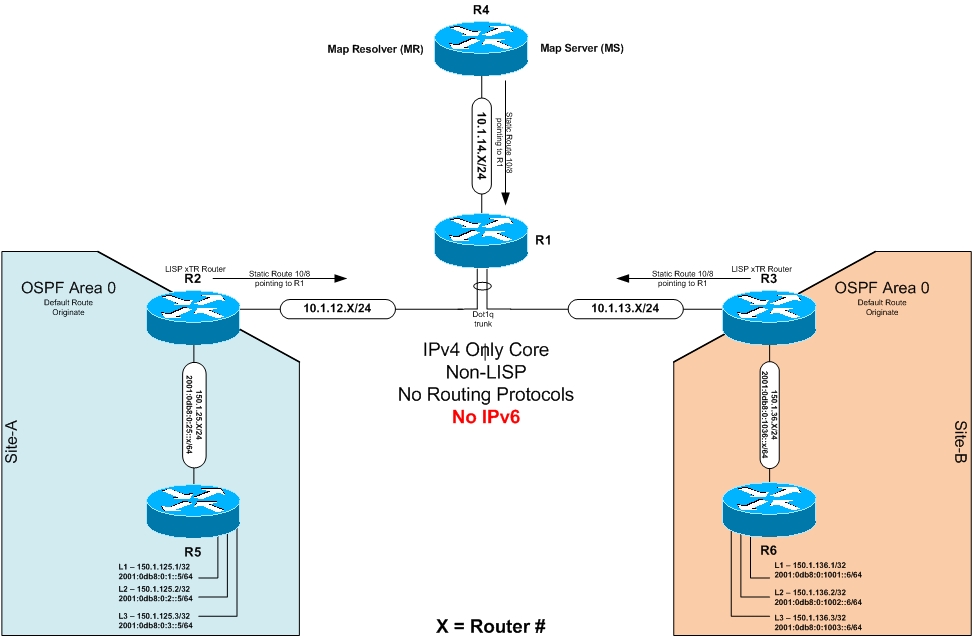
Quick rundown on color codes again:
Router Output
Notes
Commands
Lets start with R4, the LISP MS/MR device. We will configure this to accept the IPv6 networks to the xTR routers at Site A and Site B
We need to enable IPv6 Routing on R4. There will no no IPv6 interfaces, but it still needs to understand how to route IPv6 for when a request comes in
LISP_R4_MP_MR(config)# ipv6 unicast-routing
Now we need to enable the IPv6 address family under the VRF, just like we did for IPv4.
LISP_R4_MP_MR(config)# vrf definition lisp
LISP_R4_MP_MR(config-vrf)# rd 1:1
LISP_R4_MP_MR(config-vrf)# address-family ipv6
LISP_R4_MP_MR(config-vrf-af)# exit-address-family
Now enable LISP to be a map-server and resolver for IPv6
LISP_R4_MP_MR(config)# ipv6 lisp map-server
LISP_R4_MP_MR(config)# ipv6 lisp map-resolver
And just like IPv4, we need to add the IPv6 networks for the mappings for Site A and Site B
LISP_R4_MP_MR(config)# lisp site Site-A
LISP_R4_MP_MR(config-lisp-site)# eid-prefix 2001:DB8:0:1::/64 accept-more-specifics
LISP_R4_MP_MR(config-lisp-site)# eid-prefix 2001:DB8:0:2::/64 accept-more-specifics
LISP_R4_MP_MR(config-lisp-site)# eid-prefix 2001:DB8:0:3::/64 accept-more-specifics
LISP_R4_MP_MR(config-lisp-site)# eid-prefix 2001:DB8:0:25::/64 accept-more-specifics
LISP_R4_MP_MR(config)# lisp site Site-B
LISP_R4_MP_MR(config-lisp-site)# eid-prefix 2001:DB8:0:1001::/64 accept-more-specifics
LISP_R4_MP_MR(config-lisp-site)# eid-prefix 2001:DB8:0:1002::/64 accept-more-specifics
LISP_R4_MP_MR(config-lisp-site)# eid-prefix 2001:DB8:0:1003::/64 accept-more-specifics
LISP_R4_MP_MR(config-lisp-site)# eid-prefix 2001:DB8:0:1036::/64 accept-more-specifics
That is all that is necessary on R4 in order for LISP. Just to prove there is no IPv6 configured:
LISP_R4_MP_MR# sh ipv int br
GigabitEthernet0/0 [up/up]
unassigned
Now, lets to the other two routers that are not part of LISP, namely R5 and R6.
R5 first
First we will enable IPv6 routing
LISP_R5(config)# ipv6 unicast-routing
Configure and enable IPv6 OSPF process 1
LISP_R5(config)# ipv6 router ospf 1
LISP_R5(config-rtr)# log-adjacency-changes
Now we can assign our IPv6 addresses to our existing Loopback addresses and place these interfaces into OSPF PID 1 Area 0
LISP_R5(config)# interface Loopback1
LISP_R5(config-if)# ipv6 address 2001:DB8:0:1::5/64
LISP_R5(config-if)# ipv6 ospf 1 area 0
LISP_R5(config)# interface Loopback2
LISP_R5(config-if)# ipv6 address 2001:DB8:0:2::5/64
LISP_R5(config-if)# ipv6 ospf 1 area 0
LISP_R5(config)# interface Loopback3
LISP_R5(config-if)# ipv6 address 2001:DB8:0:3::5/64
LISP_R5(config-if)# ipv6 ospf 1 area 0
LISP_R5(config)# interface FastEthernet0/1
LISP_R5(config-if)# ipv6 address 2001:DB8:0:25::5/64
LISP_R5(config-if)# ipv6 ospf 1 area 0
That is all that is needed for R5. The reason we created an OSPF process is so that we can learn an IPv6 default ( ::/0 ) route from R2
now R6
Just like R5, we will enable IPv6 routing.
LISP_R6(config)# ipv6 unicast-routing
Then create the IPv6 OSPF Process 1
LISP_R6(config)# ipv6 router ospf 1
LISP_R6(config-rtr)# log-adjacency-changes
Now we will assign the IPv6 addresses to the interfaces as well as place the interfaces in IPv6 OSPF Process ID 1, Area 0
LISP_R6(config)# interface Loopback1
LISP_R6(config-if)# ipv6 address 2001:DB8:0:1001::6/64
LISP_R6(config-if)# ipv6 ospf 1 area 0
LISP_R6(config)# interface Loopback2
LISP_R6(config-if)# ipv6 address 2001:DB8:0:1002::6/64
LISP_R6(config-if)# ipv6 ospf 1 area 0
LISP_R6(config)# interface Loopback3
LISP_R6(config-if)# ipv6 address 2001:DB8:0:1003::6/64
LISP_R6(config-if)# ipv6 ospf 1 area 0
LISP_R6(config)# interface GigabitEthernet0/1
LISP_R6(config-if)# ipv6 address 2001:DB8:0:1036::6/64
LISP_R6(config-if)# ipv6 ospf 1 area 0
Again, that is all for R6. And just like R5, we created OSPF so that we can learn an IPv6 default ( ::/0 ) route from R3
So, now we can configure our xTR routers – R2 and R3. R2 first
R2
Again, we need to enable IPv6 on these devices
LISP_R2(config)# ipv6 unicast-routing
Now we create the IPv6 OSPF process and configure it to generate the default route ( ::/0 ) to R5
LISP_R2(config)# ipv6 router ospf 1
LISP_R2(config-rtr)# default-information originate always
There are no configuration changes on G0/0, it maintains its IPv4 address – there is NO IPv6 configured on this interface.
LISP_R2(config)# interface GigabitEthernet0/0
Now we can configure the EID side of the network with IPv6 and place the interface into IPv6 OSPF PID 1, Area 0
LISP_R2(config)# interface GigabitEthernet0/1
LISP_R2(config-if)# ipv6 address 2001:DB8:0:25::2/64
LISP_R2(config-if)# ipv6 ospf 1 area 0
Now we can configure this device to be an xTR and the associated LISP map-resolver and LISP map-server
LISP_R2(config)# ipv6 lisp itr
LISP_R2(config)# ipv6 lisp itr map-resolver 10.1.14.4
LISP_R2(config)# ipv6 lisp etr
LISP_R2(config)# ipv6 lisp etr map-server 10.1.14.4 key Fryguy
Now we have to tell the MR/MS what EIDs are reachable via our RLOC interface
LISP_R2(config)# ipv6 lisp database-mapping 2001:DB8:0:1::/64 IPv4-interface GigabitEthernet0/0 priority 1 weight 100
LISP_R2(config)# ipv6 lisp database-mapping 2001:DB8:0:2::/64 IPv4-interface GigabitEthernet0/0 priority 1 weight 100
LISP_R2(config)# ipv6 lisp database-mapping 2001:DB8:0:3::/64 IPv4-interface GigabitEthernet0/0 priority 1 weight 100
LISP_R2(config)# ipv6 lisp database-mapping 2001:DB8:0:25::/64 IPv4-interface GigabitEthernet0/0 priority 1 weight 100
Now onto R3
R3
Like all the other routes, we will enable IPv6
LISP_R3(config)# ipv6 unicast-routing
…and configure OSPF PID 1. Again, configuring the router to generate the ::/0 route for R6
LISP_R3(config)# ipv6 router ospf 1
LISP_R3(config-rtr)# default-information originate always
Now we an configure the IPv6 side of the router, and as with all the other routers, place the interface into OSPF
LISP_R3(config)# interface GigabitEthernet0/0
LISP_R3(config-if)# ipv6 address 2001:DB8:0:1036::3/64
LISP_R3(config-if)# ipv6 ospf 1 area 0
Again, we do not make any changes to the LISP RLOC interface, no IPv6 on this interface!
LISP_R3(config)# interface GigabitEthernet0/1
Now we can configure the router to be an xTR with the MS/MR of 10.1.14.4
LISP_R3(config)# ipv6 lisp itr
LISP_R3(config)# ipv6 lisp itr map-resolver 10.1.14.4
LISP_R3(config)# ipv6 lisp etr
LISP_R3(config)# ipv6 lisp etr map-server 10.1.14.4 key Fryguy
And now all the database mappings for the EIDs that are reachable via the RLOC interface
LISP_R3(config)# ipv6 lisp database-mapping 2001:DB8:0:1000::/54 IPv4-interface GigabitEthernet0/1 priority 1 weight 100
LISP_R3(config)# ipv6 lisp database-mapping 2001:DB8:0:1001::/64 IPv4-interface GigabitEthernet0/1 priority 1 weight 100
LISP_R3(config)# ipv6 lisp database-mapping 2001:DB8:0:1002::/64 IPv4-interface GigabitEthernet0/1 priority 1 weight 100
LISP_R3(config)# ipv6 lisp database-mapping 2001:DB8:0:1003::/64 IPv4-interface GigabitEthernet0/1 priority 1 weight 100
LISP_R3(config)# ipv6 lisp database-mapping 2001:DB8:0:1036::/64 IPv4-interface GigabitEthernet0/1 priority 1 weight 100
So, now that everything is configured, lets do a PING from R5 Loopback1 to R6 Loopback1
LISP_R5# ping ipv6 2001:DB8:0:1001::6 source loopback 1
Type escape sequence to abort.
Sending 5, 100-byte ICMP Echos to 2001:DB8:0:1001::6, timeout is 2 seconds:
.!!!!
Success rate is 80 percent (4/5), round-trip min/avg/max = 1/2/4 ms
LISP_R5#
There we go, it worked! LISP allowed us to encapsulate the IPv6 packet within IPv4 without have to configure 6to4 tunnels and such.
Why? Well, LISP encapsulate the original packet when it goes from one RLOC to the other RLOC 🙂
Now that we have that all configured and tested, lets look at the output from R4 using a the command sh lisp site summary. As you will see, we now have 4 configured networks for IPv6 and 4 registered. Our IPv4 routes and networks are still there from before, none of that changed.
LISP_R4_MP_MR# sh lisp site summary
…………………….———– IPv4 ———–……….———– IPv6 ———–
Site name……….Configured Registered Incons Configured Registered Incons
Site-A…………………………2……………2……….……………4…………….4……….
Site-B…………………………2…………….2……….…………..4…………….4……….
Number of configured sites:……………………..2
Number of registered sites:………………………2
Sites with inconsistent registrations:………….
IPv4
..Number of configured EID prefixes:…………..4
..Number of registered EID prefixes:……………4
IPv6
..Number of configured EID prefixes:…………..8
..Number of registered EID prefixes:……………8
LISP_R4_MP_MR#
Now we can look at the output from show lisp site to see what networks are registered. As you can see, both IPv4 and Ipv6 networks are listed with their perspective RLOC routers.
LISP_R4_MP_MR# sh lisp site
LISP Site Registration Information
Site Name Last Up Who Last Inst EID Prefix
Register Registered ID
Site-A 00:00:02 yes 10.1.12.2 150.1.25.0/24
…………….00:00:02 yes 10.1.12.2 150.1.125.0/24
……………. 00:00:07 yes 10.1.12.2 2001:DB8:0:1::/64
……………. 00:00:07 yes 10.1.12.2 2001:DB8:0:2::/64
……………. 00:00:07 yes 10.1.12.2 2001:DB8:0:3::/64
……………. 00:00:07 yes 10.1.12.2 2001:DB8:0:25::/64
Site-B 00:00:53 yes 10.1.13.3 150.1.36.0/24
……………. 00:00:53 yes 10.1.13.3 150.1.136.0/24
……………. 00:00:10 yes 10.1.13.3 2001:DB8:0:1001::/64
……………. 00:00:10 yes 10.1.13.3 2001:DB8:0:1002::/64
……………. 00:00:10 yes 10.1.13.3 2001:DB8:0:1003::/64
……………. 00:00:10 yes 10.1.13.3 2001:DB8:0:1036::/64
LISP_R4_MP_MR#
Now, just like I did for the IPv4 only lab, here is the debug output from debug lisp control-plane all. If you need an explanation, just refer to the prior post please.
LISP_R2# debug lisp control-plane all
LISP_R2#
*Apr 8 22:18:21.098: LISP: Processing data signal for EID prefix 2001:DB8:0:1001::6/128
*Apr 8 22:18:21.098: LISP: Remote EID prefix 2001:DB8:0:1001::6/128, Change state to incomplete (method: data-signal, state: unknown, rlocs: 0).
*Apr 8 22:18:21.098: LISP: Remote EID prefix 2001:DB8:0:1001::6/128, Scheduling map requests (incomplete) (method: data-signal, state: incomplete, rlocs: 0).
*Apr 8 22:18:21.130: LISP: Send map request for EID prefix 2001:DB8:0:1001::6/128
*Apr 8 22:18:21.130: LISP: Remote EID prefix 2001:DB8:0:1001::6/128, Send map request (1) (method: data-signal, state: incomplete, rlocs: 0).
*Apr 8 22:18:21.130: LISP: AF IPv6, Sending map-request from 2001:DB8:0:25::2 to 2001:DB8:0:1001::6 for EID 2001:DB8:0:1001::6/128, ITR-RLOCs 1, nonce 0xC4B2E8BE-0x4DCA442F (encap src 10.1.12.2, dst 10.1.14.4).
*Apr 8 22:18:21.130: LISP: Processing received Map-Reply message from 10.1.13.3 to 10.1.12.2
*Apr 8 22:18:21.130: LISP: Received map reply nonce 0xC4B2E8BE-
LISP_R2#0x4DCA442F, records 1
*Apr 8 22:18:21.130: LISP: Map Request prefix 2001:DB8:0:1001::6/128 remote EID prefix, Received reply with rtt 0ms.
*Apr 8 22:18:21.130: LISP: Processing mapping information for EID prefix 2001:DB8:0:1001::/64
*Apr 8 22:18:21.130: LISP: Remote EID prefix 2001:DB8:0:1001::/64, Change state to complete (method: map-reply, state: unknown, rlocs: 0).
*Apr 8 22:18:21.130: LISP: Remote EID prefix 2001:DB8:0:1001::/64, Starting idle timer (method: map-reply, state: complete, rlocs: 0).
*Apr 8 22:18:21.130: LISP: Remote EID prefix 2001:DB8:0:1001::6/128, Change state to deleted (method: data-signal, state: incomplete, rlocs: 0).
*Apr 8 22:18:21.134: LISP: Remote EID prefix 2001:DB8:0:1001::/64, Recalculated RLOC status bits from 0x0 to 0x1 (method: map-reply, state: complete, rlocs: 1).
*Apr 8 22:18:21.134: LISP RIB_RWATCH: (default:ipv4:base) T 10.1.13.3/32 EVENT Track start
*Apr 8 22:18:21.134: LISP RIB_RWATCH: (default:ipv4:base) N 10.1.13.3/32 Adding track
*Apr 8 22:18:21.134: LISP RIB_RWATCH: (default:ipv4:base) N 10.1.13.3/32 QP Schedule query
*Apr 8 22:18:21.134: LISP RIB_RWATCH: (default:ipv4:base) T 10.1.13.3/32 EVENT Query found route
*Apr 8 22:18:21.134: LISP RIB_RWATCH: (default:ipv4:base) R 10.0.0.0/8 d=1 p=1 -> 10.1.12.1 (base) 0 Updating
*Apr 8 22:18:21.134: LISP RIB_RWATCH: Adding to client notification queue
*Apr 8 22:18:21.134: LISP: Remote EID prefix 2001:DB8:0:1001::/64 locator 10.1.13.3 priority 1 weight 100, Added locator (method: map-reply, state: complete, rlocs: 1).
*Apr 8 22:18:21.134: LISP RIB_RWATCH: (default:ipv4:base) W 10.1.13.3/32 c=0x69B38AB8 Client notified reachable
LISP_R2#
LISP_R2#
Now from R5 I will ping the rest of the IPv6 interfaces on R6:
LISP_R5# ping ipv6 2001:DB8:0:1002::6 source loopback 1
Type escape sequence to abort.
Sending 5, 100-byte ICMP Echos to 2001:DB8:0:1002::6, timeout is 2 seconds:
.!!!!
Success rate is 80 percent (4/5), round-trip min/avg/max = 1/2/4 ms
LISP_R5# ping ipv6 2001:DB8:0:1003::6 source loopback 1
Type escape sequence to abort.
Sending 5, 100-byte ICMP Echos to 2001:DB8:0:1003::6, timeout is 2 seconds:
.!!!!
Success rate is 80 percent (4/5), round-trip min/avg/max = 1/2/4 ms
LISP_R5#
This way we can now look at the R2 LISP Map Cache
LISP_R2# sh ipv6 lisp map-cache
LISP IPv6 Mapping Cache, 4 entries
::/0, uptime: 00:11:01, expires: never, via static
Negative cache entry, action: send-map-request
2001:DB8:0:1001::/64, uptime: 00:10:50, expires: 23:49:02, via map-reply, complete
Locator Uptime State Pri/Wgt
10.1.13.3 00:10:50 up 1/100
2001:DB8:0:1002::/64, uptime: 00:00:07, expires: 23:59:45, via map-reply, complete
Locator Uptime State Pri/Wgt
10.1.13.3 00:00:07 up 1/100
2001:DB8:0:1003::/64, uptime: 00:00:02, expires: 23:59:50, via map-reply, complete
Locator Uptime State Pri/Wgt
10.1.13.3 00:00:02 up 1/100
LISP_R2#
As you can see, all the IPv6 routes are reachable via 10.1.13.3 – an IPv4 address 🙂
Here are the configs for the routers
R1
R2
R3
R4
R5
R6

Recently I have been working on a crazy busy project at work as well as preparing for the CCIE SP lab (did not pass). Well now that is all behind me so I figured I would take some personal time and play with some technology that I have read about, talked about, and even sat through presentations at Cisco Live (aka Networkers) in the past. What is this technology that has me so interested you might ask. Well, its LISP – Locator Identifier Separation Protocol (ietf draft can be found here – http://tools.ietf.org/pdf/draft-ietf-lisp-11.pdf). The next question you may have is why does this interest me? To be honest, I have no idea – just thought it was a nifty idea.
So, what is LISP? The easiest way to explain it is to give you a common analogy that we all understand, DNS. When a user wants to access a website – in this case – blog.fryguy.net, they send a DNS query to the configured DNS server. The DNS servers then resolves that DNS name to an IP address – 76.74.254.123 – and sends that back to the client. The client web application then makes a connection to the web server and retrieves the website.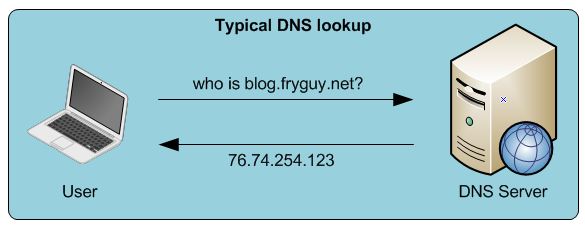
Well, in LISP a very similar thing happens. If a router needs to send a packet to 76.74.254.123, and that route is not in the local routing table – it sends a query to the LISP Map Resolver. The LISP Map Resolver then looks at its database and tells the router that the network can be reached via 4.71.170.2. The router then sends a LISP encapsulated packet to 4.71.170.2 to be then forwarded onto its ultimate destination.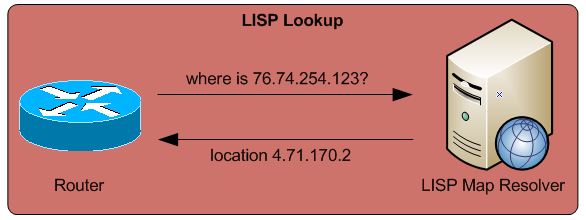
That is a very simple explanation on how it works, and one that I hope most networking folks should be able to understand. Now lets take it a step further – and think about moving a device around, yet keeping the same IP address (think vmotion). If you are registering a device location with a server, you can then move that device around and the mapping server will be able to redirect you to the correct site. There are other things that LISP can do, but I will save the IPv6 one for a future post.
We have host 100.100.100.100/32, called an EID – Endpoint Identifier – that is sitting behind Router A. Router A will register that network, or host in this case, with the LISP Map Server. It will say to get to the EID prefix of 100.100.100.100/32, send the packet to Router A. We also have another EID at 200.200.200.200/32 that is sitting behind Router B. Router B will also register with the LISP Map Server that host 200.200.200.200/32 is reachable via Router B. So if 200.200.200.200/32 wants to talk to 100.100.100.100/32, it will send the packet to Router B – Router B will then ask the LISP Mapping Server how to get to 100.100.100.100/32. The LISP Map server will respond – to get to 100.100.100.100/32, send the packet to Router A. Router B would then in turn send the packet to Router A, who will then process the packet and forward it onto 100.100.100.100/32.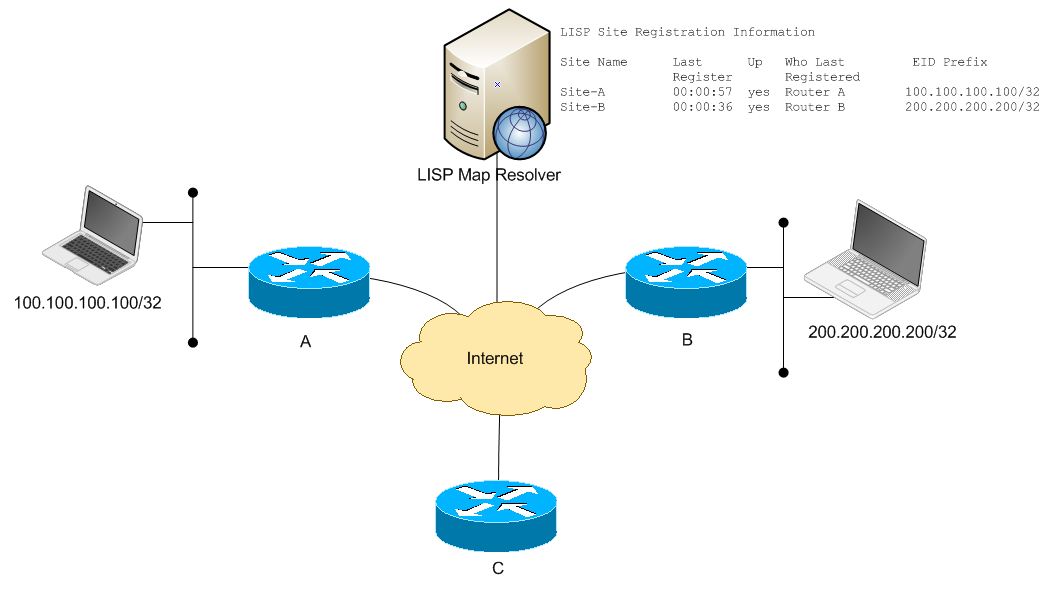 Now what happens if we move 100.100.100.100/32 to Site C? In a normal network, we would have to change the IP address of the host to a network that is reachable via Router C. You typically cannot advertise the same network from two sites and expect things to work correctly. But with LISP, you can move the host around and not change the IP address. Why? Well, the Mapping server is what tells the routers who want to talk to 100.100.100.100/32 how to get to the host.
So lets move 100.100.100.100/32 to a location in Site-C behind Router C. Router C would then register with the LISP Map server that 100.100.100.100/32 is now reachable via Router C. The next time that 200.200.200.200/32 goes to talk to 100.100.100.100/32, Router B will query the LISP Map Server who will then tell it, to get to 100.100.100.100/32, send the packet to Router C for processing.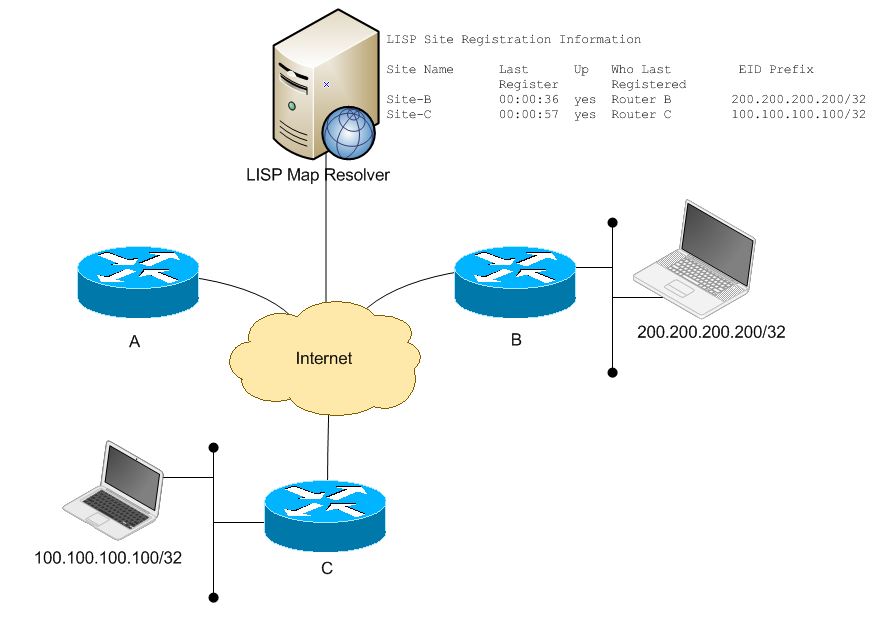
Another use case could be with a multi-homed site, like the picture below. Typically with BGP you can only “recommend” an ingress point into your network, you have no way of guaranteeing the traffic will only flow into Router B from your upstream ISP. Sure, you can prepend AS numbers; tweak the mutli-exit discriminator (MED), etc – but it is only a suggestion to your upstream ISP. So what can LISP do for us here? Easy, you can set a priority to the mapping on the LISP server. You can say that Router A has a higher priority for ingress traffic then Router B. The LISP server will then return the path with the lowest Priority listed is the preferred route. This will help to make sure that the traffic is flowing inbound the way that you want it to.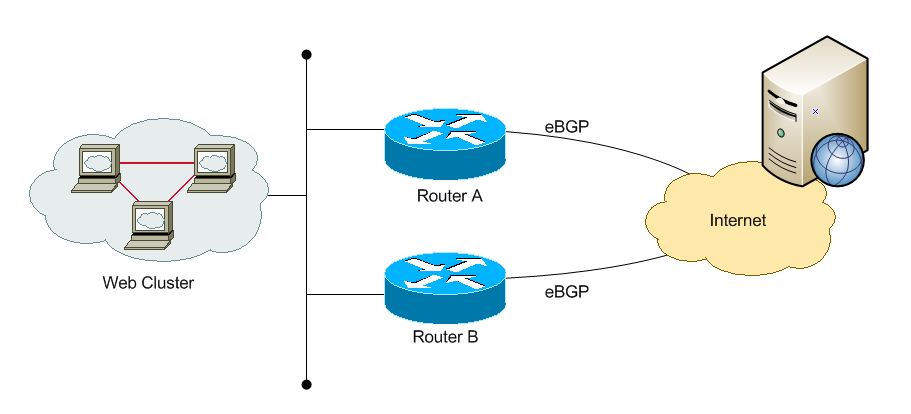
So lets list out some of the components of a LISP environment:
Since Cisco posted that picture the other day, you know this one: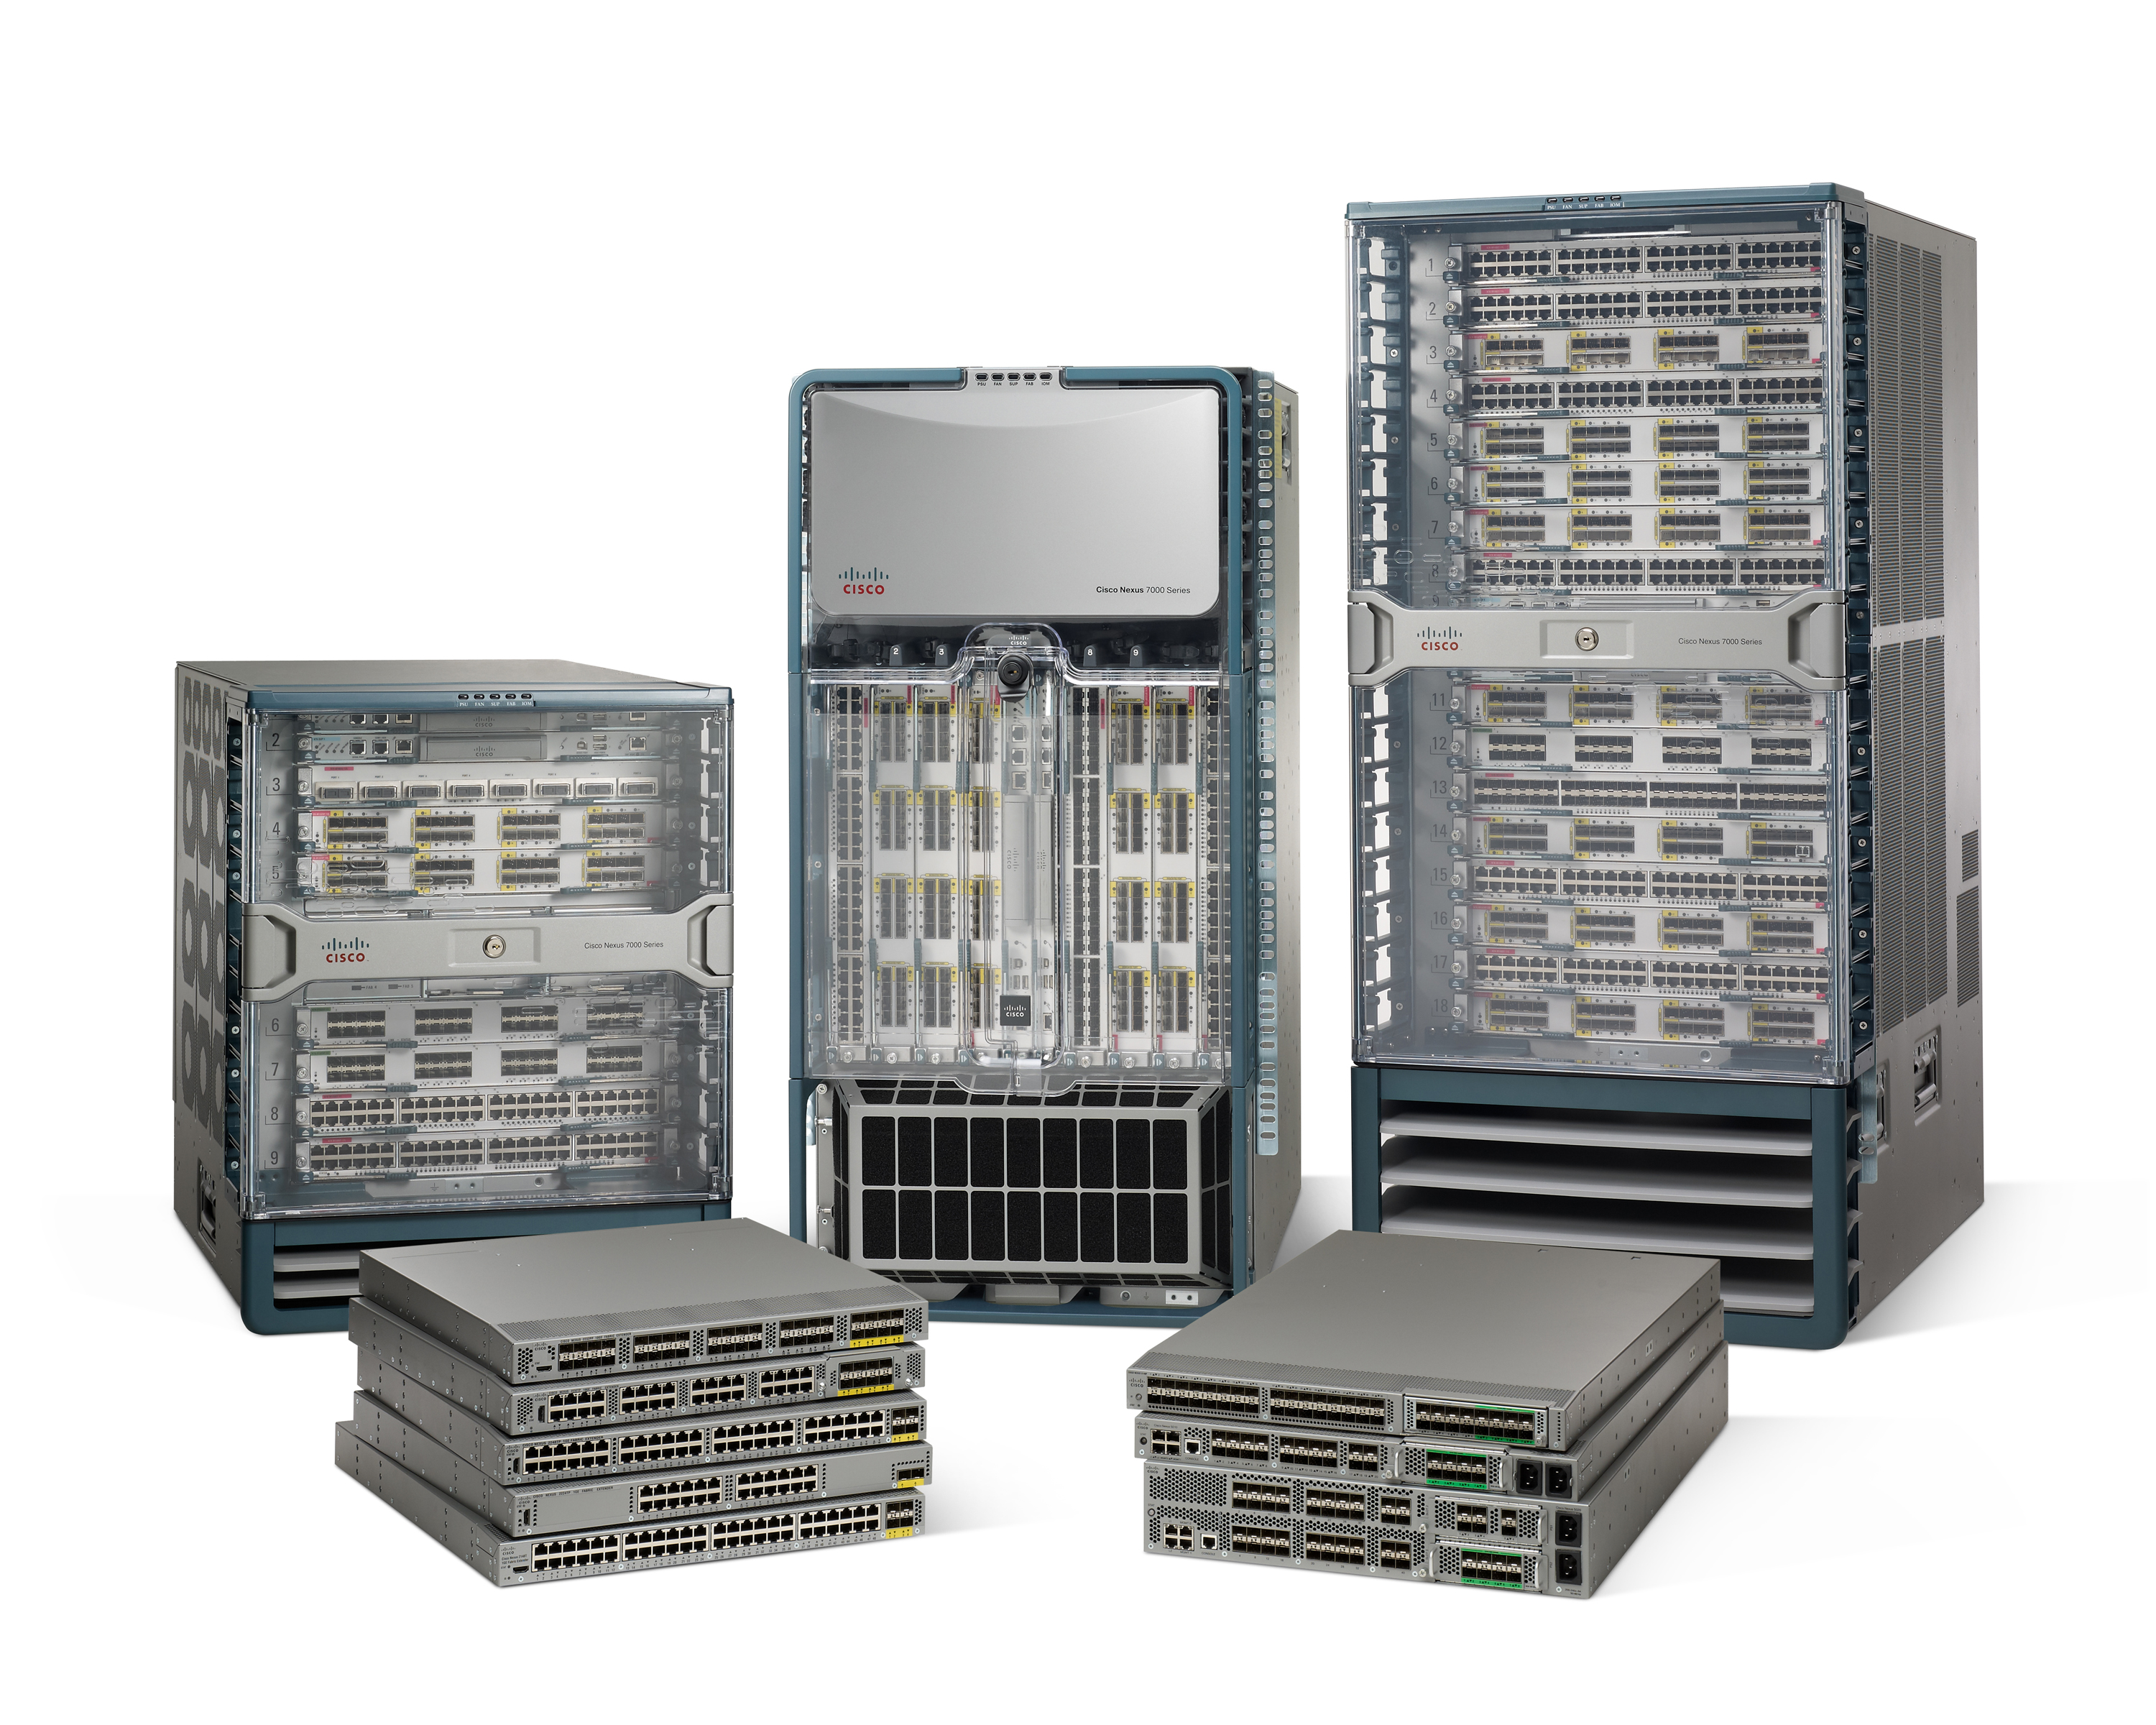
Well, since that picture was posted there has been some buzz around the chassis in the twitter feeds. Not much is officially know about this box – but the picture above proves it does exist. Not only that, I recall seeing a picture from Cisco Live 2011 – London where the EMC booth had one of these Nexus 7009 looking switches in their booth. Well here is some additional information that I have located using the assumed part number of N7K-C7009
On Cisco’s website they have a MIB posted called CISCO-ENTITY-VENDORTYPE-OID-MIB.my (clicking on that MIB will allow you to view/download it – original link here ). From what I can gather in the MIB – the Nexus 7009 will have the new Fabric-2 cards, no Fab-1 cards are even listed for this chassis. When you search the MIB, you can find the following information:
cevChassisN7Kc7009 OBJECT IDENTIFIER ::= { cevChassis 932 } — N7K-C7009 nexus-9-slot chassis
cevBackplaneN7Kc7009 OBJECT IDENTIFIER ::= { cevBackplane 57 } — MosPort9 N7K-C7009 Nexus-9-slot-backplane
cevFanN7Kc7009FanTray OBJECT IDENTIFIER ::= { cevFan 129 } — N7K-C7009-FAN Trinacria-fan-nexus9slot
cevN7Kc7009Fab2 OBJECT IDENTIFIER ::= { cevModuleN7KType 14 } — dijon9 N7K-C7009-FAB2 Fabric for Nexus7000 9slot boxster
Bonus information contained within the MIB is information on the, yet unannounced, Nexus 7006!
Granted, this is only speculation and such – but the MIB information matches what the 7009 has as well. Only time will tell if this is true.
cevChassisN7Kc7006 OBJECT IDENTIFIER ::= { cevChassis 1054 } — Nexus7000 6slot elsie n7k chassis N7K-C7006
cevBackplaneN7Kc7006 OBJECT IDENTIFIER ::= { cevBackplane 60 } — Nexus7000 6slot elsie n7k backplane N7K-C7006
cevFanN7Kc7006FanTray OBJECT IDENTIFIER ::= { cevFan 147 } — N7K-C7006-FAN fan for nexus 6slot-chassis
I also did some searching and found this list of Nexus 7009 Part Numbers, and my assumed descriptions (in blue) of what they are.
N7K-C7009-ACC-KIT Nexus 7009 Accessory Kit
N7K-C7009-BSK Nexus 7009 Bottom Support Kit
N7K-C7009-CAB-TOP Nexus 7009 Top section Cable Management?
N7K-C7009-CM-BLK Nexus 7009 Cable Management Blank? Unknown
N7K-C7009-F-BLANK Nexus 7009 Fabric Blank Interface ?
N7K-C7009-FAB-2 Nexus 7009 Fabric 2 Card
N7K-C7009-FAN Nexus 7009 Fan Tray
N7K-C7009-FD-MB Nexus 7009 Front Dook Kit
N7K-C7009-L Nexus 7009 License
N7K-C7009-RMK Nexus 7009 Rack Mount Kit
N7K-C7009-SHPPKG Nexus 7009 Shipping package
N7K-C7009-XL Nexus 7009 XL
L-N7K-C7009-XL Nexus 7009 Scalable Feature License (allows XL featuers without requiring a hardware module change)
Another part-number that I have found that is NOT referenced on the Cisco site is this 5.6KW power supply. Wonder if the 7009 can support a smaller power supply, or this is for the Nexus 7006
N7K-AC-5.6KW 5.6kW AC Power Supply
The other week (week when I stared this post, now its a month!) I attended Tech Field Day #5 in San Jose, CA. During this event, Drobo presented their technology to us – what it is – how it works – and where it is aimed. I have to admit that I have been looking at a Drobo for a few years now and never pulled the trigger – until now. Let me preface that by saying I did purchase a Netgear ReadyNAS NV+ a few years ago instead of a Drobo – and I do still have the Netgear – but am glad that I have added the Drobo to my home storage solution. I purchased this unit from Drobo directly, using my own funds, and did use a publicly available discount code of BESTDEALEVER
What is a Drobo, in case you are wondering – well – let me let Cali Lewis explain and demonstrate:
[youtube=http://www.youtube.com/watch?v=05yqvb5n36M&feature=player_detailpage]
Ok, so now that I have shown the obligatory video that everyone has probably already seen, I can continue. There are a few differences in the unit that I purchased, Drobo FS, and the one in the video. The two big differences are that the Drobo FS holds 5 drives and also has a built-in Gigabit Ethernet port. No USB or other connectivity required, just plug it into the network and go!
Why did I chose to buy a Drobo when I already have a ReadyNAS from Netgear? It comes down to the simplicity of the Drobo and how it works. The Drobo is very simple, there are no drive carriers, the lights are very easy to understand (green, red, yellow), the web interface is simple and direct, and you do not have to be a Computer person to really use it. I felt that this last piece of information is key – if ever I lost a drive when I was traveling it would be easy to walk any member of my family through the process of replacing a the bad drive.
While looking at the Drobo you can quickly gauge the health of the unit. In the picture below you can see that all the drives are healthy (Green lights on the right) and the utilization is about 30% or so (Blue lights across the bottom). What is really nice about this is that you do not need to look at the control panel software to see what is going on with the system. You can just look at the unit and know that you have space and all the drives are good. Heck, even a cell phone photo like the one below lets you know the health of the unit just by looking!