Junos – RIP

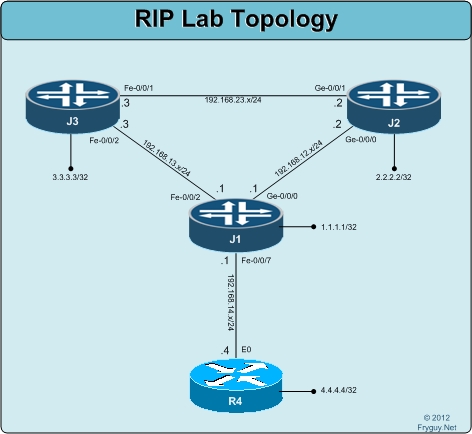
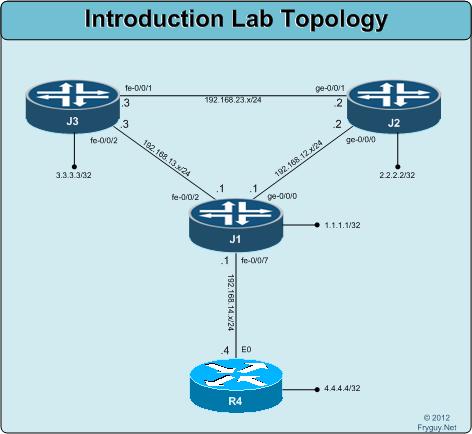
Here is a quick reminder on what the lab looks like:
Ok, time to get some routing. First up, Routing Information Protocol, RIP!
So, first up we will configure the Cisco router, R4 for RIP.
R4(config)#router rip

Here is a quick reminder on what the lab looks like:
Ok, time to get some routing. First up, Routing Information Protocol, RIP!
So, first up we will configure the Cisco router, R4 for RIP.
R4(config)#router rip
 Well it seems that once the tap has been opened, information starts to flow!
Recently Tom (@networkingnerd) and I posted some information around Journey being the band at the Customer Appreciation Event, that is again being held at Universal Studios. Well, we have just gotten some more news around the keynotes and schedules and I wanted to make sure I shared what I have with you as soon as I could.
Well it seems that once the tap has been opened, information starts to flow!
Recently Tom (@networkingnerd) and I posted some information around Journey being the band at the Customer Appreciation Event, that is again being held at Universal Studios. Well, we have just gotten some more news around the keynotes and schedules and I wanted to make sure I shared what I have with you as soon as I could.
 So, here is what we know…
It would not be Cisco Live without our wonderful host, Carlos Dominguez! I believe that this year will mark his 5th year for hosting this event. And to be honest, I cannot remember who hosted it before, he just does it so well and naturally! Glad to have you back, Carlos!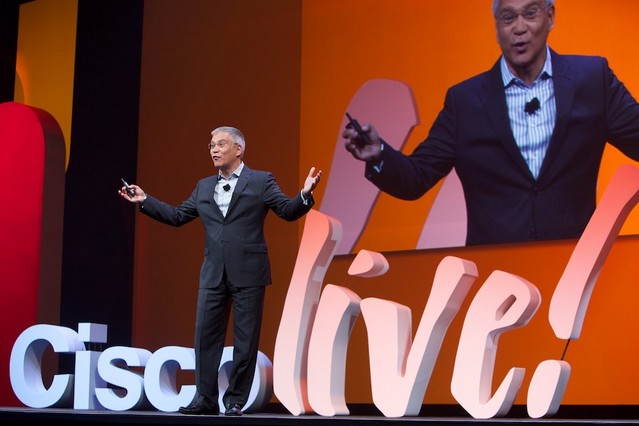

Well, it is getting to be that time of year when we start talking and getting ready for Cisco Live. When I say WE – I am referring to Tom (@networkingnerd) and John (@mrtugs) as we have done this for the past few years.
I just wanted to get this information out to you, so my Why you should go and the Venue information posting will come soon.
So, let us get to the part that everyone wants to know, where is the CAE and who is the band? Well, if you looked at the title of this post you might have figured it out.
First up – the band we chose in the voting poll is…..

Ok, time to get back into the Junos swing of things. Up next is J-Web.
Here is a quick reminder of the topology that we are using for these labs.
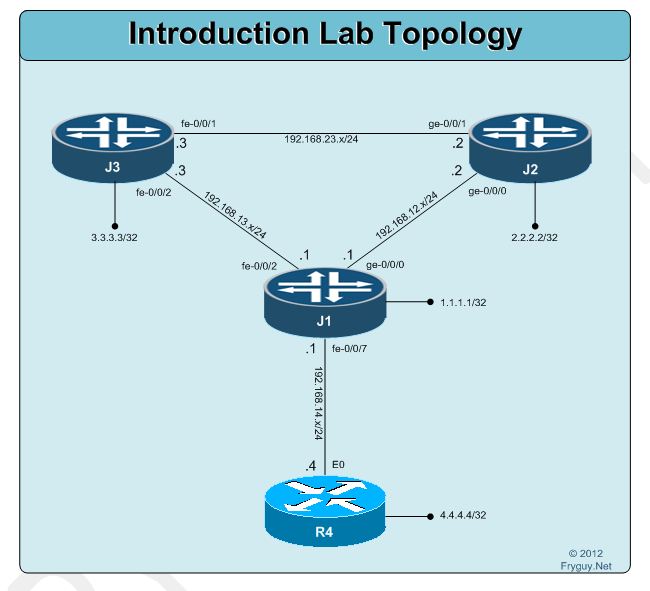
Junos devices have a web interface called Jweb. I am not going to cover using JWeb, but I will show you how to enable it and access it.
For this lab I have enabled connectivity to J1 from my home network.
To enable J-Web on the device, issue the following command and commit it.
[edit]
jfry@J1# set system services web-management http
[edit]
jfry@J1# commit and-quit
commit complete
Exiting configuration mode
jfry@J1>
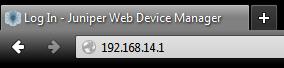
Ok, time to see what this looks like. From a web browser, enter the IP address of the router http://192.168.14.1
 Ok, I will admit I have been missing in action for too long. Was starting to think of putting my face on that carton, but I will spare you that imagery.
The holidays are a busy time for me with family and such, so that is part of it. The other part of it is that I left my employer, NTT, in December after a year of being there. It was my decision to leave, and I did it based on some internal factors that I would rather not mention. I enjoyed working there and with the team that I was on. There are some good people on that team that have a bright future!
So, where did I end up? I took a position with Torrey Point – http://www.torreypoint.com/ – as a Network Engineer focusing in Post Sale deployments. Something that I feel I am well suited for, as well as looking forward to the challenges that will be presented. I have been with them since I left NTT in December, but have not had a chance to post anything here.
One really great thing with Torrey Point, I will get more hands on time with some Juniper equipment! Love building my skills – and this is the perfect opportunity for me to do that.
Now that that is out of the way, look forward to some more Junos workbook posts in the coming week. I did complete my JNCIA in December ’12 as well, and based on some of that study – I have made a few quick edits to the Junos workbook, and more around the J-Web interface post that I am working on.
Thank you and good luck in 2013!
Oh yea – See you at Cisco Live Orlando in June!!!
Ok, I will admit I have been missing in action for too long. Was starting to think of putting my face on that carton, but I will spare you that imagery.
The holidays are a busy time for me with family and such, so that is part of it. The other part of it is that I left my employer, NTT, in December after a year of being there. It was my decision to leave, and I did it based on some internal factors that I would rather not mention. I enjoyed working there and with the team that I was on. There are some good people on that team that have a bright future!
So, where did I end up? I took a position with Torrey Point – http://www.torreypoint.com/ – as a Network Engineer focusing in Post Sale deployments. Something that I feel I am well suited for, as well as looking forward to the challenges that will be presented. I have been with them since I left NTT in December, but have not had a chance to post anything here.
One really great thing with Torrey Point, I will get more hands on time with some Juniper equipment! Love building my skills – and this is the perfect opportunity for me to do that.
Now that that is out of the way, look forward to some more Junos workbook posts in the coming week. I did complete my JNCIA in December ’12 as well, and based on some of that study – I have made a few quick edits to the Junos workbook, and more around the J-Web interface post that I am working on.
Thank you and good luck in 2013!
Oh yea – See you at Cisco Live Orlando in June!!!

Now it is time to get some housekeeping done on these routers. We will configure the interfaces on each of them. Once that is complete, we will create a Rescue configuration. A rescue configuration is a known working configuration that we can roll back to at any time. We will use this rescue config to reset the routers to a base state before each lab. Here is our Lab Topology: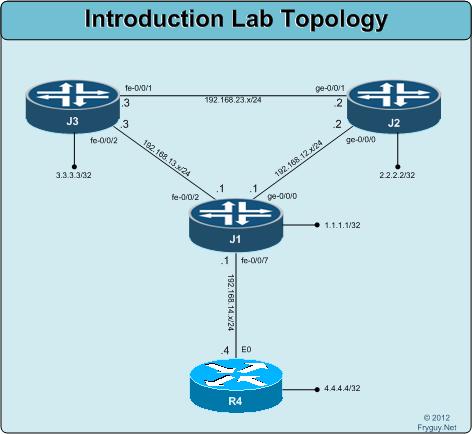
First up though, we need to get R4 (The Cisco router) configured and setup.
For R4 we need to configure E0 with an IP of 192.168.14.4/24 and the loopback with 4..4.4.4/32. Once we have it configured, we will save the config to FLASH as base.txt so we can reload it later on.
Router#
Router#conf t
Router (config)#interface Loopback0
Router (config-if)# ip address 4.4.4.4 255.255.255.255
Router (config-if)#exit
Router (config)#interface Ethernet0
Router (config-if)# ip address 192.168.14.4 255.255.255.0
Router (config-if)#no shut
Router(config-if)#exit
Router(config)#hostname R4
R4(config)#exit
R4#wr mem

Ok, I know I said I was done with the IOS XR stuff, but just had to share this.
Cisco has posted some Videos on YouTube, they are below for your enjoyment.
Also, if you are looking for an IOS XR book – here is a link to the one on Amazon.
[youtube=http://youtu.be/v16-jJE5_yA]
Guess it is time to get the party started! Just a quick note, there is a vendor that I have used in the past to get hardware for labs, if you are interested in hardware, please let me know and I will put you in touch with them. You can deal with them directly so that you know you are getting their best price.
I am not going to cover how to recovery a lost root password, but if you need that information here is a link to the Juniper KB Article KB17565 below. This article is for Junos 10.x and higher.
http://kb.juniper.net/InfoCenter/index?page=content&id=KB17565
What I will cover though is getting your Junos device up and running after you recover the root password. First thing you will want to do is zeroize the device, this will erase all configuration information and reboot the device.
root@J1> request system zeroize
warning: System will be rebooted and may not boot without configuration
Erase all data, including configuration and log files? [yes,no] (no) yes
warning: zeroizing re0
root@J1> Waiting (max 60 seconds) for system process vnlru_mem’ to stop…done</span> <span style="color: #0000ff;">Waiting (max 60 seconds) for system process vnlru’ to stop…done
Waiting (max 60 seconds) for system process bufdaemon’ to stop…done</span> <span style="color: #0000ff;">Waiting (max 60 seconds) for system process syncer’ to stop…
Syncing disks, vnodes remaining…0 0 0 done
syncing disks… All buffers synced.
Uptime: 5m9s
Rebooting…
[— Removed the reboot cycle output for this document —-]
Once the device finishes rebooting, you will be at the Amnesiac prompt. This is the prompt the system give you when there is no configuration on the device. Almost like is it brand new, out of the box!
Amnesiac (ttyu0)
login: root
(Note: No prompt for a root password as the system is not yet configured)
Well, the time has come to start posting some of the Junos stuff that I have been working on. What I have decided to do with this post is post the Hardware Information that I used for the lab. I will then reference this post in the posts to come so that anyone can see what was used. Below is a picture of the lab topology: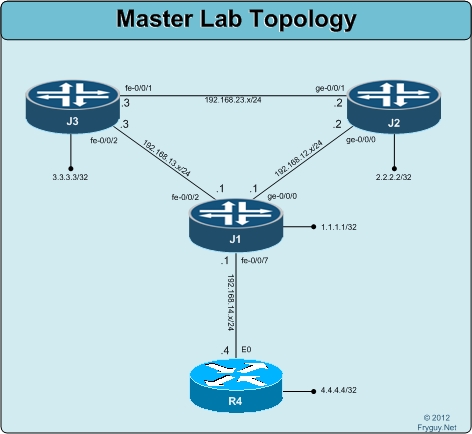
After many individual posts and changes on IOS XR, here is the Cisco IOS XR Training Workbook in its entirety.
The workbook is 105 pages long, so enjoy!
Cisco IOS XR Introduction Ver 1
It has been mentioned to me a few times that I should charge for some things, especially these large workbooks. I do not feel that way, I would rather share my knowledge so that I can continue to learn and grow. If you appreciate this information that I have provided and wish to give me some of your money, here is a donation button for that.